Part 2 of my rigging for Kre-o Get the Diamonds short.
HumanIK requires you model quadrupeds in a human style T pose, which wasn't going to work so well so I didn't try to use it this time. Instead, I used a free script from Brave Rabbit. It helped with most of the process which sped things up quite a bit. I had a couple issues with it, mostly to do with scale. It ended up being best to scale up the model to the rig and then scale it back down after the rig was finished rather then use the script's menu scale attribute.
I added my own bit to animate the jaw opening and closing. As well as making a move-able tongue. The jaw just involved added some joints to the rig. The nurbs curve acts as a controller via a simple expression on the rotation.
The tongue was inspired by a brief teaching experience with Andrew Chesworth who now works at Disney. It was a couple of years ago but I remembered he had shown me a rig he made with a tongue that had unconnected joints skinned to it. I can't remember much more about it, but I thought I'd give it a go. I grouped the joints under zeroed out locators and grouped the locators under the jaw controller. That way the joints wouldn't connect to each other, but would move with the jaw and I wouldn't have to mess with the pre-made rig more. The locators act as controllers and leave the tongue and the bottom of the mouth in their default position. And I have the back end of the tongue skinned to the a jaw joint so it always stays rooted to the mouth.
I used the same process with a wolf as well.
Showing posts with label rigging. Show all posts
Tuesday, October 15, 2013
Tuesday, October 1, 2013
Kre-o Rig
Long, probably boring post on rigging! If you don't know much about rigging, it will probably not make any sense. YAY! I learned a bunch of things.
This is actually my second go at it, after re-remembering that nothing works with HumanIK if you don't have the scale set to centimeters. Most notably my skeleton likes to shrink.
I could have just built my own rig, it might have even saved me some time. But, I want to stick with HumanIK because I feel like its going to become a staple in Maya and it really could make things a lot easier in faster in a lot of cases if it works.
I had issues with the shoulders. The Kreo toy ar,ms only lift about half way to a T-pose before the shoulders pop off which is really inconvient because:
A. HumanIK works around models in a T-pose.
B. It puts an annoying mobility issue on animating and getting humanistic poses.
After a bunch of fiddling around I found the best way was to put in 2 joints in the shoulder area and make one a clavicle like bone as far as the control rig was concerned. The "clavicle" bone is used to rotate the should like the toy would work in real life in a rigid fashion. And then the shoulder bone actually bends the shoulder piece like a flesh shoulder. It's not a perfect, but I think it works pretty well without having to mess with the HumanIK rig much.
Before I figured out the shoulder I first rigged it with a V-pose, but easily managed to switch it to a T. I grouped the joints under nulls, rotated the nulls to make the T, and then deleted the nulls. That way the joints stayed zeroed out.
The last big issue I had to tackle was rigging the face. There wasn't many face expressions they had to make, but I've never rigged textures or shaders before, and my knowledge of them isn't very advanced. I found this really great tutorial which helped a lot. I did have to get a bit more complicated because of the eyewhites and things. So I ended up using a layered shader for most of it.
However, for some reason you cannot make a set driven key or expression for the alpha on a layer in the layered texture. I found a work around by sticking a luminance utility into the alpha input. I could then make set driven keys for the R, G, and B, of the luminance attributes that would tell the alpha what value to be. So silly.
Here are some examples of the faces I can make for Quick Kick with the rig I made for him. His rig has the most options in total. I only put it what I felt was the bare minimum of what I needed. If I need more I can always add it without too much trouble. Right now he has a bunch of mouth shapes, open, closed, and squinting eyes, iris movement right and left, and raised and lowered eyebrows. I also added a full or dilated one for a shocked face, but it didn't turn out as well as I'd hoped.
Oh, and I did opt for having a simple pose to pose face, instead of having in between to switch between the expressions. I think it'll look more stop motion and fit with the sparse amount of faces, and being my first time with it, simple is probably better.
IN OTHER NEWS, art sale is approaching and I need to finish illustrations! Soon. I'm thinking of editing some of my collection of horrible horrible error/bug screen caps from Maya and making prints of them. If no one buys them, I can decorate my room with failure(the good kind). Another episode of F&T is going to be out in the next week I am told. I really have to get a bunch of work done on some of those episodes left too. My origami fish project is still hanging over me, begging me to have freetime to work on it. So painfully close to having another shot done. Also I think I may currently have a fever.
Oh yah, and now that the human characters are usable, I will be modeling a and then rigging a polar bear and a wolf. I've never finished rigging(someday I will finish that deer character I made) a quadruped, so yay for learning more things.
This is actually my second go at it, after re-remembering that nothing works with HumanIK if you don't have the scale set to centimeters. Most notably my skeleton likes to shrink.
I could have just built my own rig, it might have even saved me some time. But, I want to stick with HumanIK because I feel like its going to become a staple in Maya and it really could make things a lot easier in faster in a lot of cases if it works.
I had issues with the shoulders. The Kreo toy ar,ms only lift about half way to a T-pose before the shoulders pop off which is really inconvient because:
A. HumanIK works around models in a T-pose.
B. It puts an annoying mobility issue on animating and getting humanistic poses.
After a bunch of fiddling around I found the best way was to put in 2 joints in the shoulder area and make one a clavicle like bone as far as the control rig was concerned. The "clavicle" bone is used to rotate the should like the toy would work in real life in a rigid fashion. And then the shoulder bone actually bends the shoulder piece like a flesh shoulder. It's not a perfect, but I think it works pretty well without having to mess with the HumanIK rig much.
Before I figured out the shoulder I first rigged it with a V-pose, but easily managed to switch it to a T. I grouped the joints under nulls, rotated the nulls to make the T, and then deleted the nulls. That way the joints stayed zeroed out.
The last big issue I had to tackle was rigging the face. There wasn't many face expressions they had to make, but I've never rigged textures or shaders before, and my knowledge of them isn't very advanced. I found this really great tutorial which helped a lot. I did have to get a bit more complicated because of the eyewhites and things. So I ended up using a layered shader for most of it.
However, for some reason you cannot make a set driven key or expression for the alpha on a layer in the layered texture. I found a work around by sticking a luminance utility into the alpha input. I could then make set driven keys for the R, G, and B, of the luminance attributes that would tell the alpha what value to be. So silly.
(animation curves are set driven key connections)
Oh, and I did opt for having a simple pose to pose face, instead of having in between to switch between the expressions. I think it'll look more stop motion and fit with the sparse amount of faces, and being my first time with it, simple is probably better.
IN OTHER NEWS, art sale is approaching and I need to finish illustrations! Soon. I'm thinking of editing some of my collection of horrible horrible error/bug screen caps from Maya and making prints of them. If no one buys them, I can decorate my room with failure(the good kind). Another episode of F&T is going to be out in the next week I am told. I really have to get a bunch of work done on some of those episodes left too. My origami fish project is still hanging over me, begging me to have freetime to work on it. So painfully close to having another shot done. Also I think I may currently have a fever.
Oh yah, and now that the human characters are usable, I will be modeling a and then rigging a polar bear and a wolf. I've never finished rigging(someday I will finish that deer character I made) a quadruped, so yay for learning more things.
Sunday, March 31, 2013
More Seahorse. ft. Rigging
I rigged the seahorse last night and this morning. Here's the bone chain.
And then here it is with the controllers. It pretty simple. There is a head bob, back and forth movement for each fin, and the tail curls, uncurls and wiggles slightly side to side. The head and fins use expressions to link the joints and controllers. The tail uses set driven keys.
It feels like it went a lot smoother than the fish. Next up is animating.
And then here it is with the controllers. It pretty simple. There is a head bob, back and forth movement for each fin, and the tail curls, uncurls and wiggles slightly side to side. The head and fins use expressions to link the joints and controllers. The tail uses set driven keys.
It feels like it went a lot smoother than the fish. Next up is animating.
Friday, December 7, 2012
Fish Awakening
I've continued my work on my origami sealife short.
I've done a very basic rig using a joint chain, some simple expressions, and a few nurb curves to use as controllers.
I made a basic replica of the set used in the footage to scale including the lights.
After animating the fish in the shot I rendered and composted the effect. Here you can see the finished product, the animation, and the original film footage I took.
I've done a very basic rig using a joint chain, some simple expressions, and a few nurb curves to use as controllers.
I made a basic replica of the set used in the footage to scale including the lights.
After animating the fish in the shot I rendered and composted the effect. Here you can see the finished product, the animation, and the original film footage I took.
Sunday, August 12, 2012
Jelly Rigging
Trying to fill out my reel some more with a little rigging. Thought I'd start with my box jellyfish for something a bit different. Not finished, but the basic idea is there. Mostly ncloth tweaking, and testing with motion paths to do still. The movement isn't completely realistic, nor is the shape, as it is really hard to find good reference for them. The transparency makes it hard to make out in photos, and they are deadly, so I really can't find much footage of them. But from what I can tell, its fairly close, and definitely jelly looking.
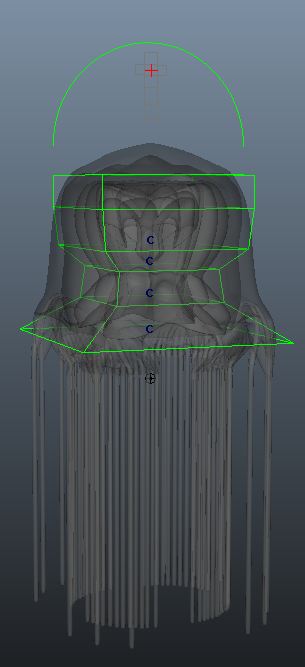
Just a lattice, some clusters, and ncloth, hooked up to two simple controllers. The plus sign slider is hooked up with set driven keys to go through the different poses of the jellyfish so you can control its speed and add in variation with its bursts. The top and bottom controller, are the same so the motion can be looped. I thought of trying to make the controller a circle dial of some sort, but I decided this way was quicker to make and wouldn't simplify animating much at all. I also just like the up and down with the jelly's up and down movements.
The outer shell and tentacles are all ncloth. I really love the way jellyfish float around. It's beautiful. This rig is really just for a swimming jelly anyway, so with this rig there isn't much control over what the tentacles do. I did have to add a lot of nconstraints to make sure the shell kept its shape and make sure the tentacles didn't pop out of its shell in the wrong place or fall out completely. Its a bit over 70 constraints, and they do cause a bit of visible lag when simming, but nothing too horrible. The tentacles do stretch with motion like they do in reel life which looks rather nice, so now its mostly about painting maps and balancing that while making sure the bodies shell keeps its relative shape.
Just a lattice, some clusters, and ncloth, hooked up to two simple controllers. The plus sign slider is hooked up with set driven keys to go through the different poses of the jellyfish so you can control its speed and add in variation with its bursts. The top and bottom controller, are the same so the motion can be looped. I thought of trying to make the controller a circle dial of some sort, but I decided this way was quicker to make and wouldn't simplify animating much at all. I also just like the up and down with the jelly's up and down movements.
The outer shell and tentacles are all ncloth. I really love the way jellyfish float around. It's beautiful. This rig is really just for a swimming jelly anyway, so with this rig there isn't much control over what the tentacles do. I did have to add a lot of nconstraints to make sure the shell kept its shape and make sure the tentacles didn't pop out of its shell in the wrong place or fall out completely. Its a bit over 70 constraints, and they do cause a bit of visible lag when simming, but nothing too horrible. The tentacles do stretch with motion like they do in reel life which looks rather nice, so now its mostly about painting maps and balancing that while making sure the bodies shell keeps its relative shape.
Subscribe to:
Posts (Atom)